Building Your Own Basic Rowboat: A Beginner's Guide
Hey there, fellow DIY enthusiasts! Ever dreamt of gliding across a calm lake in a boat you built yourself? It might sound daunting, but building a basic rowboat is more achievable than you think. This guide is for complete beginners, walking you through the process step-by-step. We'll keep it simple, focusing on a design that's easy to construct and perfect for leisurely paddling. Let's get started!

Choosing Your Design and Materials
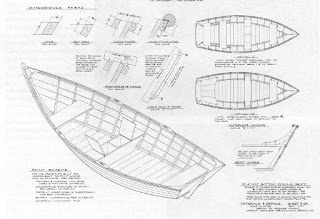
Before we dive into the tools and techniques, let's talk about the boat itself. For beginners, simplicity is key. We're going to focus on a simple, flat-bottomed rowboat. This design is incredibly stable and forgiving for those learning the ropes (pun intended!). There are tons of free plans online – just search for "simple flat-bottomed rowboat plans." Many offer different sizes, allowing you to tailor the boat to your needs and your physical strength.
Material Selection: The Heart of Your Project
The most common material for building a simple rowboat is plywood. Specifically, marine-grade plywood is highly recommended. It's treated to withstand moisture and rot, crucial for a boat that'll spend time in the water. Don't skimp here; it's a worthwhile investment to ensure the longevity of your creation. You'll likely need several sheets, depending on your chosen plans. The thickness is important too; ½-inch plywood is a good starting point for a small, lightweight rowboat.
Besides plywood, you'll need wood for the thwarts (seats) and oars. Pine or fir are good, affordable choices. Remember to get the wood pressure-treated or marine-grade if possible, to protect it from the elements.
Finally, you'll need some basic fasteners. Marine-grade screws and bolts are essential. These are specifically designed to resist corrosion in saltwater environments, making them much more reliable than standard hardware.
Tools You'll Need: Gathering Your Arsenal
Building a rowboat requires some basic woodworking tools. Don't worry; you don't need a fully equipped workshop. Here's a list of essentials:
- Measuring tape and pencil
- Circular saw or jigsaw (a jigsaw is more versatile for curved cuts)
- Drill with various drill bits (including a countersink bit for a cleaner finish)
- Screwdriver (or impact driver for faster work)
- Clamps (lots of them! You'll need these for holding pieces together while the glue dries)
- Safety glasses and hearing protection (crucial for safety!)
- Wood glue (specifically marine-grade epoxy adhesive is the best!)
- Sandpaper (various grits, for smoothing and finishing)
- Wood sealant (this will protect your finished boat from water damage)
Step-by-Step Construction: Building Your Dream Boat
This part is where things get hands-on. The exact steps will vary based on your chosen plans, but the general process remains consistent. Remember to always refer to your plans for precise measurements and instructions. These are just general guidelines.
Cutting and Assembling the Hull
First, you'll carefully cut the plywood pieces according to your plans. Take your time and make accurate cuts to ensure a proper fit. This is where a sharp blade and a steady hand are crucial. Once cut, carefully assemble the hull sections, using wood glue and screws to secure them together. Clamps will be your best friend during this phase – use them liberally to ensure a strong bond.
Adding the Thwarts and Other Structural Elements
Next, you'll install the thwarts (seats). Make sure they're securely attached and positioned for comfortable rowing. Your plans will specify their location. You might also need to install additional structural supports, depending on your design – this will add to your boat's overall strength and durability.
Finishing Touches: Sanding, Sealing, and Painting
Once the hull is complete and all structural elements are installed, it's time to sand everything down smooth. Start with coarser grit sandpaper and gradually move to finer grits for a smooth finish. Then, apply several coats of marine-grade sealant to protect the wood from water damage. Finally, you can add a coat of paint if desired. Choose a color that's both visually appealing and suitable for marine environments.
Testing and Refinements: Your Maiden Voyage
Before your maiden voyage, it's important to test the boat on calm, shallow water. This allows you to identify any issues early on, like leaks or structural weaknesses. Make any necessary repairs or adjustments before venturing into deeper water. Always wear a life jacket when testing your boat.
Adding Oars and Finishing Up
Finally, it's time to add the oars. You can either purchase pre-made oars, or you can make them yourself using the same wood as your thwarts. Make sure the oarlocks (the fittings that hold the oars) are firmly secured. Once everything is in place, carefully launch your new boat and enjoy your first paddle!
Commonly Asked Questions
- Q: How long does it take to build a rowboat? A: This depends on your experience and the complexity of the design. A simple rowboat could take a weekend for an experienced builder, while a beginner might take several weeks, working on it in their spare time.
- Q: How much does it cost to build a rowboat? A: The cost varies greatly depending on the materials you choose. Using affordable plywood and readily available lumber, you can build a basic rowboat for under $200. However, this could be higher if you opt for higher-quality materials.
- Q: Do I need any special skills? A: Basic woodworking skills are helpful, but this project is achievable for beginners. Accuracy is more important than advanced carpentry knowledge. Take your time and follow the plans closely.
- Q: What if I make a mistake? A: Don't worry, mistakes happen! Woodworking often involves some trial and error. If you make a mistake, try to rectify it or, if necessary, start over with that particular part.
- Q: Is it safe to build my own boat? A: Yes, but always prioritize safety. Use appropriate safety gear, follow the plans carefully, and test the boat thoroughly in a safe environment before venturing into deeper water. Remember to always wear a life jacket!
Building your own rowboat is a rewarding experience that combines creativity, skill-building, and the satisfaction of creating something with your own two hands. So grab your tools, get started, and prepare for some amazing adventures on the water!


0 comments:
Post a Comment